I recently had the opportunity to train dealers and large commercial customers on basic maintenance of the Walker Mower. The topic of blade maintenance came up, and there were some very interesting thoughts and ideas presented by technicians on this topic. With this in mind, I would like to put forth a few thoughts on blade maintenance (with the note that most of this information can be found in your operator’s manual).

Blade sharpening is important to overall deck and mower maintenance as it affects performance, along with wear and tear on the mower components. Therefore, it is recommended that you inspect your blades every 10 hours of use for dullness, bends, cracks or nicks in the cutting edges. This is especially important when mowing in sandy soils or abrasive grasses.
Always observe basic safety requirements when removing and sharpening the blades on your deck. Use eye protection and gloves, and remove the ignition key from the tractor. Do not attempt to sharpen or reuse a blade that is less than 3/4 inches (19 mm) wide on the flat of the blade. Also, replace the blade if the thickness of the flat section is 1/16 inch (1.6 mm) or less.
If the blades require sharpening, there are several options available. There are commercial units that are expensive and work very well; some use grinding wheels or sanding belts. Then there is the more common and familiar method of hand grinding or filing.
During the sharpening of the blade, try to maintain a 30-degree angle on the cutting edge, using consistent strokes along the top edge of the blade. Don’t grind or attempt to sharpen the blade on the bottom of the cutting edge. Alternate sharpening one edge of the blade, then the other, trying to remove the same amount of material from both cutting edges. Once you are satisfied that the blade is sharp, check the balance of the blade before reinstalling it onto the deck.
Blade balancing is often overlooked in the process of blade maintenance. Balancing, like sharpening, can be achieved in different ways—from expensive blade balancers to a nail in the wall to hang the blade horizontally. Once you place the blade on the balancer, if either end of the blade drops, you need to remove material from that side by grinding away small amounts of metal until the blade balances.
With your blades sharp and balanced, you can reinstall them on your deck. Gear-driven decks have a blade hub and trash guard that the blade attaches to; belt-driven decks do not. Two shear bolts (10-24×5/8-inch stainless steel machine screws) mount the blade to the hub. These are designed to protect the blade drive gearbox from damage if a blade encounters a shock load, such as rocks, metal or ground. They are necessary to protect your deck drive system.
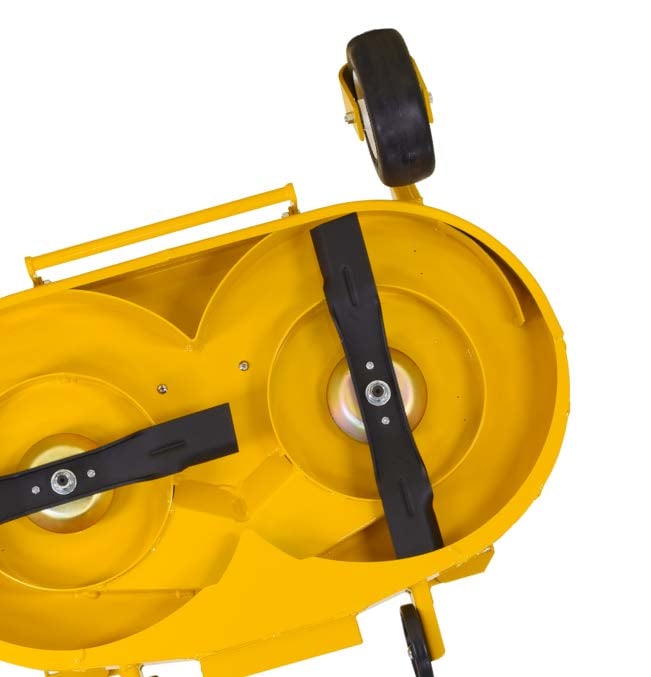
Using reverse rotation blades, the C36R deck is designed to evenly cut thinner grass on finished turf, and is ideal for tight spaces and fitting through narrow gates.
Install the 5/8-18 blade mount nut, and with a torque wrench, tighten the nut to 60 pound-feet (81 newton meters). Over-tightening may result in the shear bolts not shearing on impact, causing damage to the gearbox, whereas under-tightening may cause nuisance shearing. Belt-driven deck blade nuts need to be torqued to 70 pound-feet (90 newton meters).
The thought of blade maintenance and its relevance may not have occurred to you in the past, but my hope is that this information may help you understand its importance in the overall maintenance of your Walker Mower. This simple blade maintenance tutorial can help you maximize the value of your Walker Mower investment and give you many years of satisfaction with your purchase.


 Site Search


